This post might include affiliate links. See my policy.
A splendid, gentle top curve from dough that's proofed just enough. Just enough to still have “energy” to expand upward in the oven, but not so much that it causes an erratic fissure due to the lack of scoring. A balance. Add to that a striking exterior color from a bold bake, the enticing aroma from freshly milled flour, and a speckled oat topping—all contributing to a truly wonderful bread. But beyond all this, it's one that's meant to be eaten in thick slices carved from the loaf with a spread of soft butter, toasted and topped with fresh preserves, or used to cobble together a sandwich piled a little too high.
When baking this whole-grain wheat and spelt pan bread I could have sworn the kitchen smelled of honey… Or perhaps it was my eagerness to eat the result. When you go the distance from raw berries, freshly milled flour, to baked bread — all the while controlling each part of the transformation1 — it's easy to get a little antsy, impatient, and, frankly, hungry.
At 100% fresh milled whole grain, and naturally leavened, this loaf is truly healthy fare. When making loaves like this sometimes I feel the need to mix-in seeds or nuts for even more nutrition, and that's certainly possible here, but for me and this flour blend, this is just right. It's fun to dredge up the simple and humble bread tin, to discover anew the appeal of confining bread to rise and bake in a single vessel. The tin can be an enabler to push the limits, to be more adventurous with hydration, grain types, and mix-ins. Chances are no matter what you do, as long as you can “get it into the tin,” your bread will bake up just fine.
Let's have some fun.
Flour Selection
After trying a myriad of different grains in pan bread formulas, white wheat has to be among my favorites. The mild flavor works so well in this bread, and by adding in a touch of spelt, there's an additional added layer of flavor. Spelt is almost always my go-to choice when I want to add in something special, something unexpected, something I can tell people: “oh that taste? That's spelt.” I love it. However, feel free to sub out the spelt for whatever you have on hand. Because the white wheat is milder, you could change the 30% or so spelt to Khorasan, einkorn, or even more traditional red wheat.
I used fresh milled organic whole white wheat (sourced from Breadtopia), as described below, but you could also use the excellent organic white wheat from King Arthur Flour. Their flour is also delicious when used in sourdough waffles and many other bread here at my site. I milled the white wheat and spelt in my Mockmill 100 home mill. I haven't talked much about this mill yet, but I've been using it in my kitchen for a while, and I can safely say it's a workhorse. It mills superbly fine flour, is built to last, and is priced exceptionally well. With mills like this, it's easy for everyone to start milling fresh and healthy flour right from home.
For both the white wheat and spelt I mostly set the mill the finest level and turned it on. The result was freshly milled flour with a captivating aroma brimming with possibility.
Whole Grain Wheat and Spelt Pan Bread
This recipe yields a large loaf of bread: at 1400g it’s almost as large as my imposing Einkorn miche. If you are worried about fitting the dough in your pan, scale the formula down to a smaller loaf, or split it into two 700g loaves.
In a previous sandwich bread post, I was able to comfortably fit 1200g in a 9” x 5” x 2.75” pan—use this as a gauge for whatever pan you’re using.
In this recipe, I'm using Campbell's Bread Pan; the dimensions are 8.85″ x 4.7″ x 4.7″ deep (235mm x 120mm x 120mm deep).
Vitals
Total Dough Weight
1400 grams
Pre-fermented Flour
4.00%
Hydration
88%
Yield
One 1,400 gram pan loaf (or two 700 gram pan loaves)
Levain Build (Stiff)
I’ve come to rely on a stiff levain build when making bread with large percentages of freshly milled flour. The stiff levain, which can be anywhere from 50%-65% hydration depending on your starter and flour, brings loads of flavor to the resulting bread. I've also found that a stiff levain has a larger readiness window when it can be mixed into a dough.
To make the stiff levain, I usually mix everything up with my plastic spatula, then knead it by hand when it becomes hard to stir. Then, I shape it into a ball and press it down into the bottom of a 1/2 liter Weck glass jar. Pressing the levain down like this helps me visually inspect when it's ready to be used: I look for a leveling off of the “dome” that is created as it's ripening. Additionally, you’ll see significant aeration at the sides, and, if you gently poke at the top, it’ll give readily under pressure. At 50% inoculation2 my levain was ready to be mixed into the dough after 5 hours at 78-80°F (25-26°C).
Note that the baker’s percentages listed below are with respect to the final dough ingredients and do not take into account the levain.
Weight
Ingredient
Baker's Percentage
480g
Fresh Milled Hard White Winter Wheat (100% extraction)
68.75%
218g
Fresh Milled Spelt (100% extraction)
31.25%
625g
Water
89.58%
14g
Salt
1.98%
58g
Ripe, stiff levain (see above)
8.33%
Method
1. Stiff Levain – 10:00 a.m.
Build the levain (everything listed in the Levain Build section above) and store somewhere around 78°F (25°C) ambient until ripe, about 5 hours.
At this time it might be convenient for you to mill the required white wheat and spelt. Milling this early in the schedule also gives the flour time to cool down.
2. Autolyse
Due to the high percentage of freshly milled flour, there's no need to use the autolyse technique with this recipe.
3. Mix – 3:00 p.m.
Add the called-for flour to a mixing bowl. Break up the ripe, stiff levain on top of the flour and add all but 100g of the water. Mix by hand until well combined.
The mix will be very wet and almost look like it won’t hold together. Perform folds in the bowl to add a little strength for about 5 minutes. Mixing in the bowl keeps things clean, and with dough this highly hydrated, it can be challenging to perform a mixing technique like slap and fold (see my guide to the slap and fold technique here) on the counter.
Add the salt to the top of the mixed dough and mix to incorporate. After this mixing, assess the dough. Does it look like it can handle the remaining 100g of water? Add the water if so, if not, omit the remaining water3.
Transfer the dough to a tub or thick-walled bowl for bulk fermentation.
5. Bulk Fermentation – 3:00 p.m. to 6:30 p.m.
At 76-80°F (24-26°C) ambient temperature, the dough should be ready to divide after around 3 hours and 30 minutes.
Perform a total of 3 sets of stretches and folds during the bulk, spaced out by 30 minutes (the first set will take place 30 minutes after starting this step). To perform a set, with wet hands grab one side of the dough in the bowl stretch up and fold over to the other side. Do this four times at each direction (North, South, East, West).
After the last set, let the dough rest for the remaining bulk fermentation time.
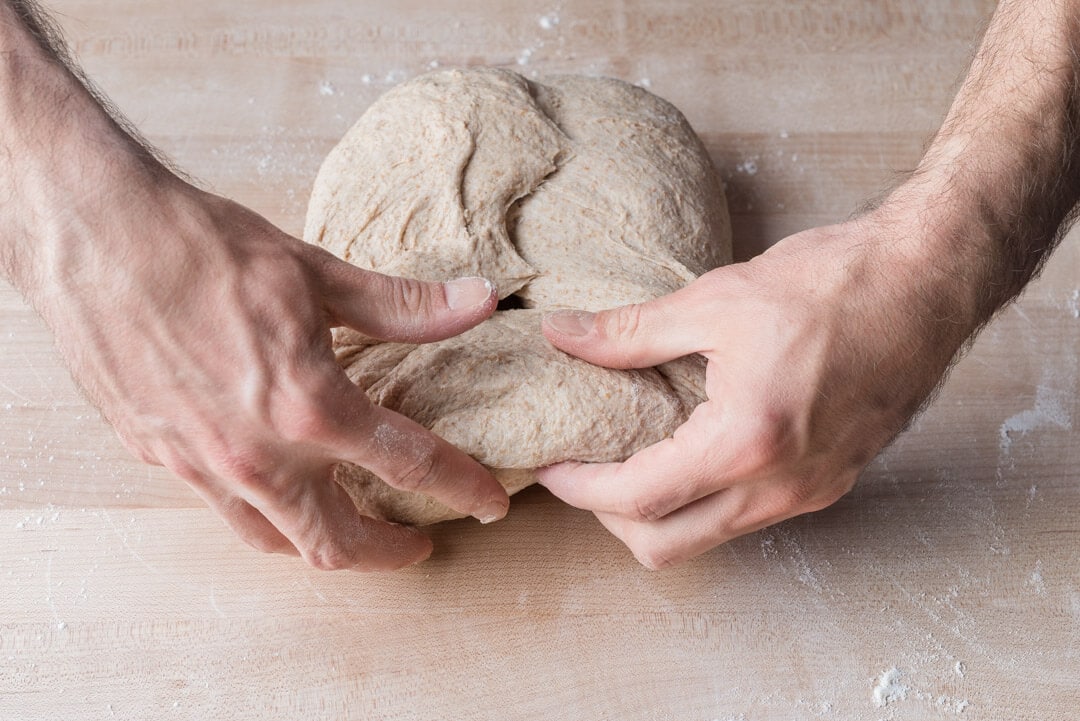
6. Divide & Preshape – 6:30 p.m.
At the end of bulk fermentation, the dough will look slightly wet and be sticky to the touch, but it will be well risen and smoother than right after mixing (see the picture, below). Dump the dough from the bulk container to an un-floured work surface. Because this recipe only makes a single, large loaf, there is no need to divide the dough. Gently turn it on the bench with your hand and a bench knife to coerce it into a round.
Let the dough rest for 30 minutes, uncovered. Keep an eye on the dough. If it starts to spread quickly into a thin pancake, skip the remaining resting time and proceed directly to shaping.
7. Shape – 7:00 p.m.
For this recipe, I'm using Campbell's Bread Pan, which results in bread with beautifully straight sides, a tall rise, and a golden crust. If you don't have this pan, you can divide the recipe in half and bake each in a Pullman pan or other standard loaf pan.
I love topping these loaves with raw, rolled oats: they crisp up in the oven and provide little bursts of toasted nut flavor when eating each slice. Lay a kitchen towel out next to your work area and spread a thin layer of thick rolled oats on top.
Lightly flour the top of your rested, and relaxed, dough round on the work surface. Using a bench knife and your hand, flip the round over. Fold the bottom up to the middle. Then fold each side, left and right, over to the other to form what looks like an open envelope in front of you. Then, grab the top and fold it up and down to just above the middle. Using both hands, grab the new top and gently roll it down into a long tube (imagine rolling down a beach towel or yoga mat).
Using your bench knife and a floured hand, scoop up the shaped tube and invert it onto the towel with oats (the seam will be facing up, see below). Grab the tube with each hand and gently rock it back and forth, so the oats stick to the outside.
Finally, transfer the tube of dough to the pan. At this point you should be able to just drop in the dough, but if you have trouble don’t fret. Once you drop it in use your fingers to tuck the dough down at the sides. You want a smooth top on the dough when it’s in the pan so it rises uniformly.For more information on shaping, proofing, and scoring pan loaves check out my guide to shaping pan loaves.
8. Proof – 7:30 p.m. to 8:30 a.m. (the next day)
Cover the pan in an airtight reusable plastic bag and place it into the fridge overnight.
9. Bake – Preheat oven at 7:45 a.m., Bake at 8:30 a.m.
Preheat your empty oven to 450°F (230°C). There’s no need for baking stones since the dough is in a pan.
I steamed my oven in my usual way, with one deviation: I didn't use the pan with lava rocks because there was plenty of steam with only the soaked & rolled towels. See my post on how to steam your home oven for more details.
At the end of the bake, return the loaf to the oven without the pan to fully color the exterior.
Once you've preheated the oven, place the pan with soaked towels and the pan with your dough inside. Bake for 30 minutes. After 30 minutes, turn the oven down to 425°F (220°C), remove the steaming towels, rotate the pan 180°, and bake for 25 minutes. After this time the top should be well colored, remove the pan from the oven using oven-safe mitts. Carefully remove the loaf from the pan and return the loaf to the oven to bake for an additional 15-20 minutes at 425°F (220°C). I like to do this final bake outside of the pan to add more color to the exterior. If you find the top of the loaf starts to darken too much, tip it to the side and bake until your liking.
It’s essential with a high hydration pan bread that the loaf is fully baked out. Otherwise, you’ll have a gummy result. The outside should be colored a dark mahogany, and the interior temperature should read around 210°F (99°C). Finally, let this bread rest at least a few hours, possibly even overnight depending on when you baked, to ensure the interior is fully set.
Conclusion
With whole grain wheat and spelt pan bread like this, it's pretty hard to justify buying anything in a plastic bag at the market. Aside from the extra time needed to mill the grain, this is a relatively straightforward formula that you could work into a weekly routine without issue. I'd venture to say pan bread might be some of the most baked around here—everyone needs good old fashioned toast, right?
Crust
Thin and crunchy. This crust is not what you'd find from bagged sandwich bread: it has some bite to it, but it's not overly harsh or hard. To me, it's just right. The oats add unexpected crunch and little pockets of toasted oat flavor, a nutritious addition that isn't necessary, but welcome.
Crumb
A magnificent interior for 100% fresh milled whole grain. The high hydration helps here but so does a gentle and effective final shape. It can be a challenge to retain the open structure of this dough when first topping with oats and then finally into the pan. But, as long as you get it into the tin, this bread always bakes up nice.
With bread like this, I'm not looking for a super open interior, we need support for butter and jam, right?
Taste
There's a subtle note of sourness in this bread that's typical of most naturally leavened bread, but it's so subtle it just adds depth of flavor. If you find yours is sour focus on your starter maintenance: feed it regularly and perhaps next time use it a bit sooner. Additionally, you could also try making the levain with half white flour and half whole wheat, to make things even milder.
The mild flavor of white wheat and pronounced spelt are in just the right balance with this whole-grain wheat and spelt pan bread. You can tell it's whole grain, but it's not overwhelming. It brings wonderful flavor to sandwiches and toast rather than just performing the backseat task of delivering other ingredients.
Whole Grain Wheat and Spelt Pan Bread Troubleshooting
Why is the inside of my bread gummy?
As I mentioned in the Bake section above, this loaf must be fully baked. If you have an instant-read thermometer, ensure the interior registers at least 205°F (96°C) before removing it from the oven. If you find it's burning before reaching this temperature, you might want to try reducing the heat to allow for a longer bake. It's also possible your dough is under proofed, which can lead to a dense and gummy interior. Make sure you do a complete bulk fermentation and final proof. Finally, try to wait at least several hours, preferably overnight, before slicing this loaf. Due to the high water content, cutting too early can result in gummy slices.
Why is my crust thicker than yours in the photos?
If the crust is too thick, reduce the bake time when the loaf is returned to the oven without the pan. Additionally, you could try steaming the oven a bit more or spritzing the top of the loaf with water just as you load it into the oven.
Or as much control as we'd like to think we have over fermentation.↩
The percentage of mature starter used to build the levain.↩
Next time add the water if you find the dough was just fine by the end of the bake.↩
Maurizio Leo is a home baker, James Beard Award winning and New York Times Bestselling author, and the creator of the award-winning sourdough website, The Perfect Loaf. He has spent the past decade baking sourdough bread in Albuquerque, New Mexico.