

I typically associate fluffy, packaged white bread with something that has a complete lack of flavor and texture, but this sourdough shokupan is anything but. The lengthy natural fermentation process imbues the loaf with subtle sour notes—that are tempered just enough by a sweet levain—resulting in a nice balance of depth and complexity. The gentle aroma of butter is warm and pervasive, bringing a touch of savoriness. And while the texture of this bread is soft to the extreme, when sliced thick and heavily toasted, it’s perfect for a sando (sandwich), or even… pizza toast?
In one of my previous newsletters, I mentioned that I treasure Craig Mod’s insightful and quirky2 newsletter. He self-published a book about the famed pizza toast available throughout Japan, and I haven’t been able to shake the idea of the gooey, cheesy toast ever since. Unfortunately, both times that I traveled Japan, I didn’t get to taste the delectable snack, but it’s just what it sounds like: a thick slice of fluffy Japanese milk bread topped with tomato sauce, cheese, and other toppings, and then baked.

And after making the above pizza toast, it is just as good as you'd imagine. But back to this naturally leavened shokupan—which is what, exactly?
What is shokupan (Japanese milk bread)?
Shokupan is a Japanese-style bread sometimes called Hokkaido milk bread, or simply Japanese milk bread. The hallmarks of this bread are its soft, aromatic, and golden crust and an interior that’s ultra-tender. If you could make bread from gathering clouds from the sky, this would be it.
Shokupan calls for adding a high percentage of milk or cream to the dough. Part of this liquid is used to make a tangzhong (more on this below), which is added to the dough during mixing. In addition to the small percentages of butter, sugar, and more milk, the tangzhong brings copious tenderness to the loaf—all without the need for artificial additives or extreme proportions of enrichments (fat, sugar, and/or egg).
My shokupan dough is much softer than what you might find in other shokupan recipes due to the dough’s relatively high level of milk and enrichments. Because of this, the dough is not easily divided and rolled out with a rolling pin. However, I find this soft and slightly sticky dough results in a loaf that's extra tender. And this is also the reason why you won’t get the spiraled sides sometimes seen in Japanese milk bread, but it’s worth it.
If you thought my soft sourdough dinner rolls were soft, this bread takes the idea into entirely new territory.

What is tangzhong or yudane?
Tangzhong and yudane are similar techniques in which you pre-cook a portion of the flour into a paste, then add this paste to the dough during mixing. Tangzhong calls for actively cooking flour over the stove, whereas yudane simply combines a boiling liquid with the flour and lets the mixture rest, typically overnight. Both methods result in a gelatinized starch-paste that achieves the same end goal: bringing extreme tenderness to the final bread without the need for a high level of enrichment.
See my guide to using tangzhong or yudane for a thorough look at both of these techniques.
Flour and ingredient selection
For this recipe, I prefer using high-protein white flour to bring strength to the dough and attain ample volume with an open interior. Therefore, I used King Arthur Baking Bread Flour at 12.7% protein.
If you don’t have high-protein white flour, all-purpose flour will work, but you may want to hold back 10-20 grams of the milk during mixing, only adding it in at the end only if the dough feels cohesive and strong.

Baking schedule
This lightly-enriched sourdough shokupan is mixed and baked the same day to ensure a minimally sour flavor profile. It is possible to spread the bake out over two days, but know that the flavor might be slightly different than intended (more sourness and complexity). To bake over two days, right after shaping, retard (cold-proof) the dough overnight in the pan, covered.

Sourdough shokupan formula
Vitals
| Total dough weight | 680 grams |
| Pre-fermented flour | 11.0% |
| Levain in final dough | 32.1% |
| Yield | One loaf |
Total formula
Desired dough temperature: 78°F (25°C) (see my post on the importance of dough temperature).
| Weight | Ingredient | Baker’s percentage |
| 275g | High-protein white flour (King Arthur Bread Flour) | 90.0% |
| 31g | Tangzhong: High-protein white flour (King Arthur Bread Flour) | 10.0% |
| 122g | Tangzhong: Whole milk | 40.0% |
| 79g | Whole milk | 26.0% |
| 50g | Egg, beaten (about one medium) | 16.5% |
| 49g | Unsalted butter | 16.0% |
| 22g | Superfine sugar (Caster sugar) | 7.0% |
| 34g | Water | 11.0% |
| 6g | Fine sea salt | 1.9% |
| 13g | Ripe sourdough starter, 100% hydration | 4.4% |

Sourdough shokupan method
1. Prepare the levain – 9:00 p.m., the night before mixing
Mix the following ingredients in a container and leave them covered at a warm temperature, 74-76°F (23-24°C), to ripen overnight.
| Weight | Ingredient | Baker’s percentage |
| 34g | High-protein white flour | 100.0% |
| 7g | Superfine sugar | 20.0% |
| 34g | Water | 100.0% |
| 13g | Ripe sourdough starter, 100% hydration | 40.0% |
2. Make the tangzhong – 8:00 a.m., the day of mixing
In a medium saucepan over medium-low heat, add the 31 grams tangzhong flour and 122 grams tangzhong milk. Cook, whisking continuously, until the mixture thickens and becomes a paste (like mashed potatoes), 4 to 6 minutes. Because the tangzhong is very small, keep a close watch on it as it will thicken quickly. Remove the pan from the heat and spread the tangzhong out on a small plate to expedite cooling. Set aside.
3. Mix – 9:00 a.m.
There is no autolyse step for this dough (see my guide to the autolyse technique for when and why I like to use the technique) because the dough is quickly and effectively strengthened in my KitchenAid stand mixer.
| Weight | Ingredient |
| 241g | High-protein white flour |
| 79g | Whole milk |
| 50g | Egg, beaten (about one medium) |
| 49g | Unsalted butter |
| 15g | Superfine sugar |
| 6g | Fine sea salt |
| 87g | Levain |
| All | Tangzhong (from Step 2) |
Note: Warm the milk in the microwave or over the stove, as necessary, to help meet the final dough temperature of 78°F (25°C). See my post on how to bake sourdough bread in the winter for tips to keeping your dough warm.
First, cut the butter into 1/2″ pats. Set them on a plate to warm to room temperature.
To the bowl of a stand mixer fitted with the paddle attachment, add the flour, milk, egg, sugar, salt, ripe levain, and tangzhong. Mix on low speed (STIR on a KitchenAid) for 1 to 2 minutes until the ingredients come together and no dry bits remain. Next, switch to the dough hook attachment and mix on medium speed (2 to 3 on a KitchenAid) for 4 to 5 minutes until the dough smooths and begins to cling slightly to the hook. This is a very soft dough and won’t completely clear the sides of the bowl at this point.
Let the dough rest in the bowl for 10 minutes.
Turn the mixer on low speed (STIR on a KitchenAid) and mix for 2 to 4 minutes until the dough gains more strength and begins to cling once again to the dough hook. Next, with the mixer running, add the room temperature butter, one pat at a time, waiting to add each pat until the previous one is fully absorbed. Adding all the butter will take 5 to 8 minutes. In the end, the dough will still be very soft, and it won’t altogether remove from the sides of the bowl. Transfer the dough to a bulk fermentation container and cover.
3. Bulk fermentation – 9:30 a.m. to 1:30 p.m. (4 hours)
At a warm room temperature, 74-76°F (23-24°C), bulk fermentation should take about 4 hours. If your kitchen is cooler, place your bulk container in a small home dough proofer, or extend the bulk fermentation time to give the dough more time to ferment. The dough is ready when it is smooth, puffy, and well-risen.
Give this dough two strengthening sets at 30-minute intervals. The first set starts after 30 minutes from the start of bulk fermentation. Give the dough a series of stretches and folds for the first set. Wet your hands, grab one side, and stretch it up and over the dough to the other side. Next, rotate the bowl 180° and perform another stretch and fold (this forms a long rectangle in the bowl). Then, rotate the bowl 90° and do another stretch and fold. Finally, turn the bowl 180° and do one last stretch and fold. The dough should be neatly folded up in the bowl.
For the second set, which starts 30 minutes after the completion of the first set, scrape the dough onto a clean counter. With wet hands, perform a few slaps and folds until the dough tightens and smooths. Then, rotate the dough with a bench scraper to form a tight ball (similar to how you'd shape a boule). Finally, transfer the dough back to the bulk fermentation container, cover, and rest for the remainder of bulk fermentation.

4. Divide and shape – 1:30 p.m.
Grease a 9 x 4 x 4-inch Pullman pan with neutral oil.
Fill a small bowl with water and place it next to your work surface. Scrape the dough onto a clean counter. Using a bench scraper in your dominant hand and other hand wet, divide the dough into three pieces, each weighing 200 grams (you will have a tiny bit of scrap leftover).
Then, shape each piece into a very taut round. As you shape each piece, place it into the Pullman pan, tucking it in tight so that each subsequent piece fits.


Cover the pan with a large, reusable plastic bag and seal.
5. Proof – 1:45 p.m. to 5:15 p.m.
At warm room temperature, 74-76°F (23-24°C), this dough should take 3 ½ hours to fully proof. If your kitchen is cooler, expect it to take longer.

When fully proofed, the dough should rise almost to the rim of the Pullman pan.
6. Bake – 5:15 p.m.
This sourdough shokupan can be baked without the Pullman pan lid. With the lid on, no egg wash is necessary; just slide the lid into place and bake the loaf. The result will be bread with four completely straight sides. Alternatively, you can brush the top of the dough with an egg wash (which is a blended mixture of 1 whole egg and a splash of whole milk) just before baking, then leave the lid off. Wait until the oven is preheated to put the lid on or brush with egg wash.
Preheat the oven with a rack in the bottom-third to 350°F (175°C).
Place the pan into the oven and bake for 45 minutes. Then, take the pan out of the oven and carefully remove the lid. The crust should be a light golden brown and the loaf should have an internal temperature of around 200°F (93°C). If the temperature is lower, slide the cover back on, return the pan to the oven, and bake for 5 minutes longer. Then, check the internal temperature again.
Remove the pan from the oven, uncover, and let the loaf rest in the pan for 10 minutes. Then, turn the loaf out onto a wire rack and let cool completely (I prefer to let it cool overnight).
This sourdough shokupan will stay soft and moist for up to a week if the bread is stored properly.
Print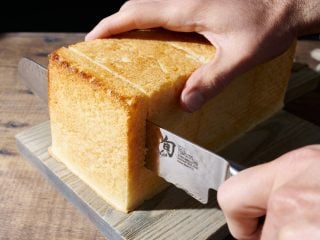
Sourdough Shokupan (Japanese Milk Bread)
- Prep Time: 8 hours
- Cook Time: 30 minutes
- Total Time: 8 hours 30 minutes
- Yield: 1 loaf
Description
A Japanese-style bread with an incredibly thin, aromatic crust and super-soft interior. Perfect for sandwiches, toast, and pizza toast (yes, pizza toast). This naturally leavened bread has very subtle sour notes with a buttery finish and is as delicious as it is golden in color.
Ingredients
Levain
- 34g high-protein white flour (King Arthur Baking Bread Flour)
- 7g superfine sugar
- 34g water
- 13g ripe sourdough starter, 100% hydration
Tangzhong
- 31g high-protein white flour
- 122g whole milk
Main Dough
- 241g high-protein white flour
- 79g whole milk
- 50g egg (about one medium)
- 49g unsalted butter, at room temperature
- 15g superfine sugar
- 6g salt
- 87g ripe levain
Topping
- If not using the Pullman pan lid, one whole egg and splash of whole milk for egg wash
Instructions
- Levain (9:00 p.m.)
In a medium jar mix together the Levain ingredients. Cover the jar and keep it at a warm temperature overnight. - Make the tangzhong (8:00 a.m. the next day)
In a medium saucepan, add the flour and milk. Turn the heat to medium-low and cook, whisking continuously, until the mixture thickens and becomes like a paste, about 3-4 minutes. Let cool before mixing with other ingredients. - Mix (9:00 am)
To the bowl of a stand mixer fitted with the paddle attachment, add the flour, milk, egg, sugar, salt, ripe levain, and tangzhong. Mix on low speed for 1 to 2 minutes until the ingredients come together and no dry bits remain. Next, switch to the dough hook attachment and mix on medium speed for 4 to 5 minutes until the dough smooths and begins to cling slightly to the hook. Let the dough rest in the bowl for 10 minutes. Turn the mixer on low speed and mix for 2 to 4 minutes until the dough gains more strength and begins to cling once again to the dough hook. Next, with the mixer running, add the room temperature butter, one pat at a time (dding all the butter will take 5 to 8 minutes). Transfer the dough to a bulk fermentation container and cover.
-
Bulk Fermentation (9:30 a.m. to 1:30 p.m.)
This dough will need 2 sets of stretches and folds during bulk fermentation where the first set starts after 30 minutes into bulk fermentation and the subsequent set is 30-minutes later. For the second set, I like to do a few light slap and folds on the counter to finish strengthening the dough. After the second set of stretches and folds, let the dough rest, covered, for the remainder of bulk fermentation.
- Divide and shape (1:30 p.m.)
Grease a 9 x 4 x 4 Pullman pan with neutral oil. Using a bench scraper in your dominant hand and other hand wet, divide the dough into three pieces, each weighing 200 grams (you will have a tiny bit of scrap leftover). Then, shape each piece into a very taut round. As you shape each piece, place it into the Pullman pan, tucking it in tight so each subsequent piece fits. Cover the pan with a reusable plastic bag and seal. - Warm Proof (1:45 p.m. to 5:15 p.m.)
Let the dough proof at warm temperature for about 3 1/2 hours until the dough rises just to the rim of the Pullman pan. - Bake (5:15 p.m.)
Preheat your oven to 350°F (175°C). Slide the lid of the Pullman pan on and bake for 45 minutes. Then, take the pan out of the oven and carefully remove the lid. The crust should be a light golden brown and have an internal temperature of around 200°F (93°C). If the temperature is lower, slide the cover back on and return the pan to the oven to bake for 5 minutes longer, and check again. Once baked, remove the pan from the oven, uncover, and let the loaf rest in the pan for 10 minutes. Then, turn the loaf out to a wire rack to cool completely (I prefer to let the loaf cool overnight).
Notes
- To make this sourdough shokupan vegan, use a butter alternative and nut milk in place of the dairy.

Sourdough shokupan (Japanese milk bread) Frequently Asked Questions
Can I proof this shokupan dough overnight in the refrigerator?
Yes, but know that the flavor might be slightly sourer given the longer proof time. Here’s how to do it: When you have finished shaping the dough and it’s in the Pullman pan, cover the pan with a large plastic bag, seal, and place in the refrigerator overnight. The next day, remove the pan from the fridge and let the dough finish proofing on the counter until it’s risen to the rim of the pan, 4 to 5 hours.
Can I make this sourdough shokupan without a stand mixer?
Yes, but given the added egg, butter, and sugar, I prefer using a stand mixer to develop the dough efficiently. If mixing by hand, hold back the butter and use the slap and fold technique to significantly strengthen the dough before massaging the room-temperature butter into the dough.
Can I use nut milk instead of dairy milk and make this Japanese milk bread vegan?
Yes, you absolutely can. See my guide to tangzhong and yudane for more on why this works.
Can I bake this without a Pullman pan?
Yes! If you don’t have a Pullman pan or pan with a lid, use a standard loaf pan (9 x 5 x 2.75-inches) instead. Then whisk together an egg wash (beat together 1 whole egg and a splash of whole milk) and gently brush the top of the dough with the wash before baking.
Can I use all-purpose flour instead of bread flour for this milk bread recipe?
All-purpose flour will work, but you may want to hold back 10-20 grams of the milk during mixing, only adding it in at the end if the dough feels cohesive and strong.
What's next?
While there's no denying this sourdough shokupan is delicious, sometimes a more wholesome bread hits the spot: look at my honey whole wheat pan loaf that also uses pre-cooked flour for extra tenderness.
